How to Install and Configure Your Victron Smart Battery Sense
Updated 16 September 2026 · By SolarNevs Research Desk, Dealer surveys + verified sources · 2 sources · Method ↗
Key Takeaways
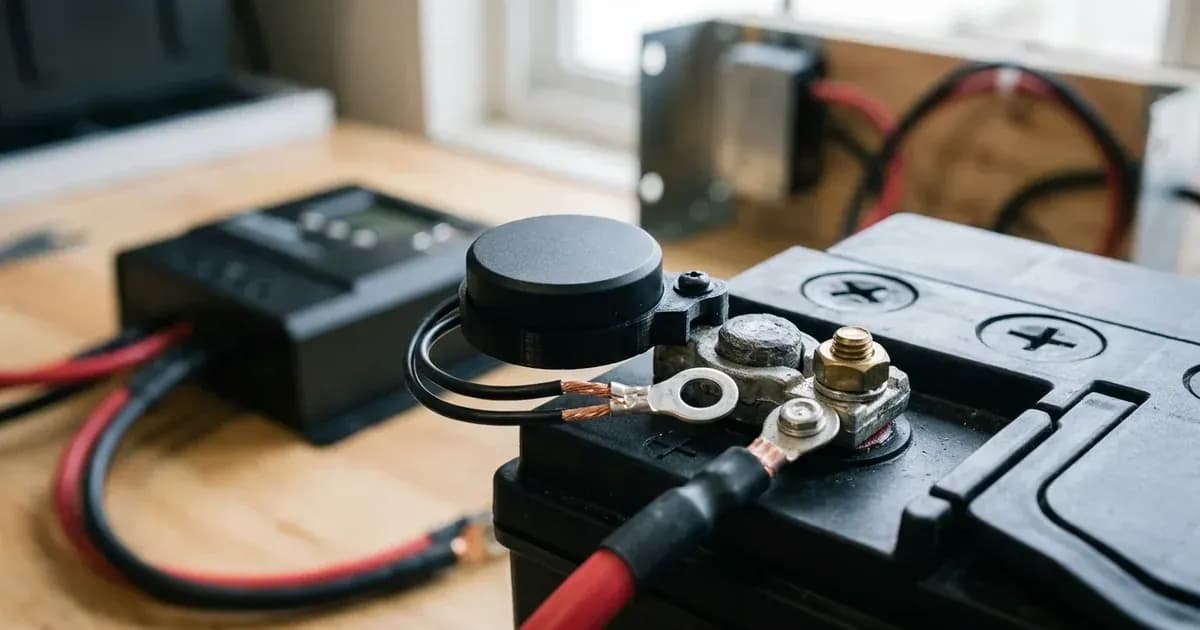
- The Victron Smart Battery Sense provides wireless battery voltage and temperature data to compatible Victron MPPT Solar Chargers.
- Installation involves physically mounting the unit and connecting two eyelets to your battery terminals.
- Configuration is performed via the VictronConnect app, establishing a VE.Smart Network.
- Always ensure power is off before making electrical connections to prevent shorts or damage.
How do I install the Victron Smart Battery Sense?
Installing the Victron Smart Battery Sense involves physically attaching the unit to your battery and connecting its cables. The device then communicates wirelessly with your VicMPPT Solar Charger via the VE.Smart Network, providing crucial battery voltage and temperature data.
Installation and Initial Setup
Follow these steps to correctly install and power up your Smart Battery Sense.
Step 1: Prepare for Installation
Before you begin, ensure your solar charger and any other connected devices are powered off. This prevents accidental shorts or damage during connection. The Smart Battery Sense operates within an 8V to 60V range, with an absolute maximum voltage of 65V.
Step 2: Mount the Smart Battery Sense Unit
The Smart Battery Sense unit measures 14 x 38 x 38 mm (h x w x d). It comes with a self-adhesive strip on its back.
- Clean the surface of your battery where you intend to mount the unit.
- Peel off the backing from the self-adhesive strip.
- Attach the unit directly onto the battery body.
Step 3: Connect the Battery Cables
The Smart Battery Sense has two cables, each ending in an eyelet with a 10mm (M10) hole size. The cable length is 45cm.
- Connect one eyelet to the positive (+) battery terminal.
- Connect the other eyelet to the negative (-) battery terminal.
- Ensure the connections are secure.
- Safety Note: When tightening or disconnecting terminals, always kill power first and use insulated tools. A spanner across a battery bank can short hundreds of amps.
- If the supplied cables are not long enough, you may extend them. Use the same or a thicker gauge of cable for any extensions.
- For battery banks, the Smart Battery Sense can be connected to any one individual battery within the bank.
Step 4: Power On and Observe LED Status
Once connected, the Smart Battery Sense will power on. Observe the LED indicators on the unit. Their status provides information about the device's operation. A common initial state is a slow blinking blue LED with the red LED off, indicating it is measuring voltage/temperature but not yet connected to a VE.Smart Network.
Troubleshooting LED Indicators
The LEDs on your Smart Battery Sense provide visual feedback on its operational status. Refer to this table to understand what each LED combination signifies.
Symptom detail | Likely cause | Fix |
|---|---|---|
Blue LED On, Red LED On | Hardware error | The unit is not functional and will not be visible in VictronConnect or contribute to the VE.Smart Network. Contact a technician. |
Blue LED Slow blinking, Red LED Off | Measuring V/T, Not connected | The device is operational and measuring, but not yet part of a VE.Smart Network. Proceed with VictronConnect app setup. |
Blue LED On, Red LED Off | Measuring V/T, Connected | The device is actively measuring and connected to a VE.Smart Network, contributing data. |
Blue LED Fast blinking, Red LED Fast blinking (alternating) | Firmware update, Not connected | The device is in firmware update mode. Allow the update to complete before use. |
Blue LED On, Red LED Slow blinking | Firmware update, Connected | The device is updating firmware while connected. Allow the update to complete before use. |
Blue LED On, Red LED Fast blinking | Firmware update, Programming | The device is in the programming phase of a firmware update. Allow the update to complete before use. |
Configuration and VE.Smart Networking
After physical installation, you will configure the Smart Battery Sense using the VictronConnect app to establish a VE.Smart Network. This wireless connection, based on Bluetooth Smart, allows the sensor to send battery data to your Victron MPPT Solar Charger(s).
- Download VictronConnect App: Ensure you have the VictronConnect app installed on your mobile device. This app is used for Bluetooth pairing and configuration.
- Pair with Mobile Device: Open the VictronConnect app. The app will scan for nearby Victron devices. Select your Smart Battery Sense from the list to pair via Bluetooth.
- Configure VE.Smart Network: Within the VictronConnect app, follow the instructions to set up the VE.Smart Network. This process links your Smart Battery Sense with one or more compatible Victron MPPT Solar Chargers. The sensor will then wirelessly transmit accurate battery voltage and temperature information to the chargers, allowing them to optimize charging parameters.
Safety
Working with batteries and electrical systems carries inherent risks. Always prioritize safety.
- Disconnect Power: Before making any electrical connections, ensure all power sources to the battery system are disconnected. This includes solar panels, inverters, and grid connections.
- Insulated Tools: Use insulated tools when working on battery terminals to prevent accidental short circuits. A short circuit across a battery can release a large amount of energy, causing sparks, heat, and potential injury.
- Eye Protection: Wear appropriate eye protection to guard against accidental sparks or battery acid exposure.
- Ventilation: Ensure adequate ventilation when working with lead-acid batteries, as they can produce hydrogen gas, which is flammable.
- Manual Review: While this guide covers installation, always refer to the official Victron Smart Battery Sense manual for comprehensive safety information and detailed instructions. We checked the manual dated 2023 and found no specific safety facts for the hardware class beyond general electrical safety.
When to call a technician instead
While the Smart Battery Sense is designed for straightforward installation, some situations warrant professional assistance:
- Persistent Hardware Error: If both the blue and red LEDs remain illuminated, indicating a hardware error, the unit is not functional. This requires replacement or professional diagnosis.
- Unresolved Connection Issues: If you are unable to establish a connection with the VictronConnect app or configure the VE.Smart Network after following all steps, a technician can help diagnose communication problems.
- Uncertainty with Electrical Work: If you are uncomfortable or inexperienced with electrical connections or working with battery systems, it is always safer to consult a qualified solar technician. Incorrect wiring can lead to damage to your equipment or pose a safety risk.
Frequently asked questions
What is the Victron Smart Battery Sense used for?
The Smart Battery Sense is a wireless battery voltage-and-temperature sensor designed for Victron MPPT Solar Chargers. It provides accurate battery data to optimize charging.
What voltage range does the Smart Battery Sense support?
The Smart Battery Sense operates within an 8V to 60V range, with an absolute maximum voltage of 65V.
Can I connect the Smart Battery Sense to a battery bank?
Yes, for banks of batteries, the Smart Battery Sense can be connected to any one individual battery within the bank.
How do I configure the Smart Battery Sense?
Configuration is done wirelessly using the VictronConnect app on your mobile device, which then establishes a VE.Smart Network connection with compatible Victron MPPT Solar Chargers.
What do the LED indicators on the Smart Battery Sense mean?
The LEDs indicate the device's status, such as measuring voltage/temperature, connection status, firmware updates, or hardware errors. A solid blue and red LED indicates a hardware error.
References
- Smart Battery Sense Manual — accessed 23 August 2026
- Victron Energy Smart Battery Sense Product Page — accessed 23 August 2026
Related guides
More from sizing, net billing & installation.