Maxpower Inverter Battery Not Charging: Troubleshooting Guide
Updated 6 September 2026 · By SolarNevs Research Desk, Dealer surveys + verified sources · 4 sources · Method ↗
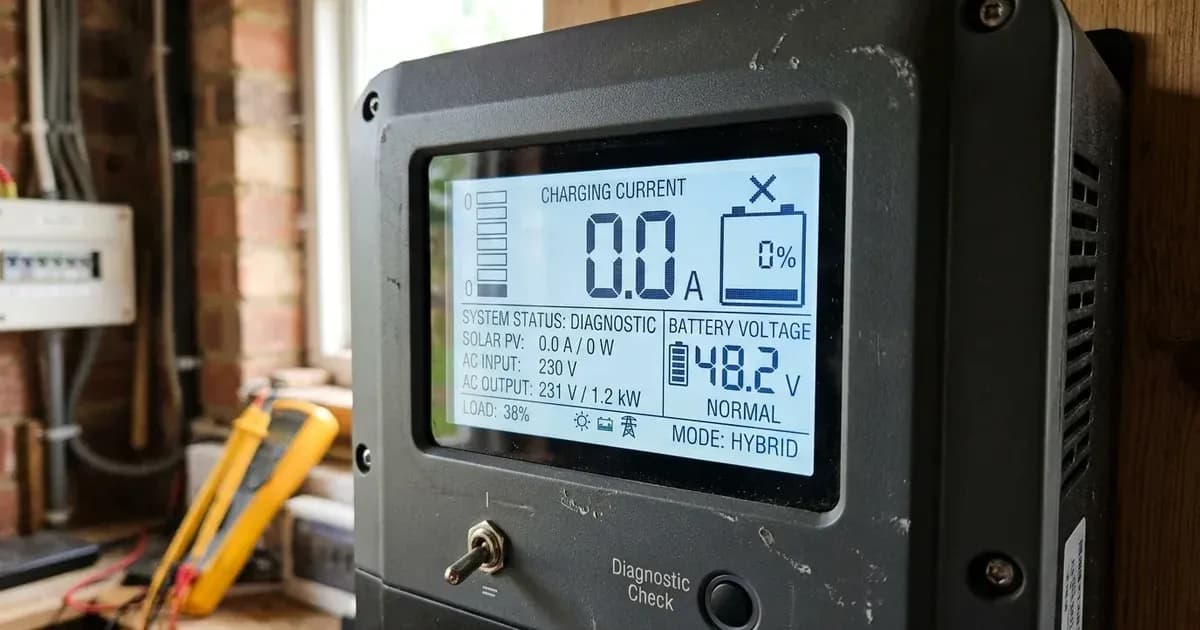
Key Takeaways
- The most common cause for a Maxpower Suntronic inverter not charging is incorrect charger source priority settings (Program 16).
- Always check the inverter LCD display for warnings like "PV energy is low" (Warning 15) or "Battery is over-charged" (Warning 03).
- Ensure solar panels produce sufficient start-up voltage (60 Vdc ± 10 Vdc for Suntronic PV 5000/6000 (PV 7000 Pro and PV 8000 Ultra use a 120–430 VDC MPPT window)) and AC grid input is active.
- For safety, always isolate power and wait at least 5 minutes for internal capacitors to discharge before servicing connections; contact certified technicians under your 3 Years standard manufacturer warranty on the Suntronic retail line (some Voltas models carry 5–10 year warranties) for internal faults.
Why is your Maxpower inverter battery not charging?
If your Maxpower inverter battery is not charging, the most frequent culprits are misconfigured charging priority settings or insufficient power from your solar panels or the utility grid. The first step is to identify whether your inverter is a Suntronic (built on the Voltronic Power OEM platform) or Voltas (built on the Sofar Solar OEM platform) model, as troubleshooting steps and program numbers differ. This guide focuses on Maxpower Suntronic series inverters, which use a 2-digit program structure (Programs 01 to 60+) and standard 2-digit fault codes (01 to 59).
For pricing context and product comparisons across the brand, explore our Maxpower solar inverter price in Pakistan guide or check the complete inverter error code glossary.
Diagnosis
Follow these systematic steps to diagnose why your Maxpower Suntronic inverter battery is not charging:
- Check Inverter Display for Errors or Warnings:
- Fault 03 (Battery voltage is too high): Indicates battery bank voltage has exceeded the high DC cut-off threshold (33 V for 24 V or 63 V for 48 V systems). The inverter stops charging to protect the battery bank.
- Fault 04 (Battery voltage is too low): Indicates battery voltage has dropped below the low DC cut-off threshold (21.0 V for 24 V or 42.0 V for 48 V systems).
- Warning 03 (Battery is over-charged): Battery bank voltage is higher than the standard charging curve; the inverter beeps once every second.
- Warning 15 (PV energy is low): Solar panel generation is insufficient to support charging or load; the inverter beeps twice every 3 seconds. Common at dawn, dusk, or on cloudy days.
- BMS communication lost / lithium comm error (Warning 60 / 61): Indicates RJ45 communication loss between lithium battery BMS and inverter BMS port.
- Blank screen / No response: If the inverter is completely unpowered upon startup, battery voltage is far too low (<1.4V/Cell) or polarity is reversed. If it shuts down automatically after 3 seconds, battery voltage is too low (<1.91V/Cell).
- Verify AC Input Power (for grid charging):
- Ensure WAPDA grid power is active.
- Check the AC input breaker. If the input protector trips, the inverter LCD displays 0 for input voltage while the green LED flashes.
- Confirm AC input voltage is within acceptable operating limits: 170-280 VAC in UPS mode (Program 03) or 90-280 VAC in Appliance mode.
- Inspect Solar Panel (PV) Input (for solar charging):
- Check for panel shading and ensure PV cables are securely connected.
- Measure open-circuit string voltage (Voc) with a digital multimeter. For Suntronic PV 5000/6000, the MPPT start-up voltage is 60 Vdc ± 10 Vdc (operational range 60Vdc~450Vdc). PV 7000 Pro and PV 8000 Ultra use a 120–430 VDC MPPT window. Solar charging will not initiate below this threshold. For Voltas HYD-8K/10K-H6 PRO single-phase models, the startup voltage is 100 V (the three-phase HYD-20K-H6 starts at 200 V).
- Clean dust and dirt buildup from panels to restore normal generation.
- Examine Battery Connections and Health:
- Inspect battery cables and terminal connections. When working near battery terminals, always kill power first and use insulated tools to prevent accidental short circuits that can discharge hundreds of amps.
- If the internal relay clicks repeatedly on and off while LCD and LEDs flash, the battery is disconnected.
- Check individual battery voltages. A defective or sulfated cell in a lead-acid bank prevents the entire series string from charging normally. When inspecting flooded tubular cells or topping up with distilled water, always wear eye protection and add pure distilled or demineralized water only; never add acid.
- Review Inverter Program Settings:
- Program 16 (Charger source priority): If set to 'CUT' (Utility first), the inverter will not charge from solar when grid is present. If set to 'OSO' (Only Solar), the grid will never charge the battery. Set to 'SNU' (Solar and Utility) or 'CSO' (Solar first) to enable solar charging.
- Program 01 (Output source priority): In 'SUB' mode with weak solar, available PV power is routed directly to the AC load, leaving none for battery charging.
- Program 02 & Program 11 (Charging current limits): If maximum charging current is configured too low, battery charging will be extremely slow.
- Program 05 (Battery type): Selecting the wrong chemistry profile causes incorrect charging voltages.
- Program 26 (Bulk) & Program 27 (Floating): Setpoints must match battery manufacturer recommendations referenced at 25°C.
Cause and Fix Table
Symptom detail | Likely cause | Fix |
|---|---|---|
Inverter displays Warning 15 (PV energy is low) | Insufficient solar input (shading, dust, low voltage) | Check solar panels for shading or heavy dust buildup. Measure PV array voltage; for Suntronic PV 5000/6000, ensure it is above 60 Vdc ± 10 Vdc. For Voltas HYD-8K/10K-H6 PRO single-phase models, ensure it is above 100 V (the three-phase HYD-20K-H6 starts at 200 V). |
Battery not charging from grid (WAPDA) | Program 16 (Charger source priority) set to 'CSO' (Solar first) or 'OSO' (Only Solar) | Change Program 16 to 'SNU' (Solar and Utility) or 'CUT' (Utility first) to allow grid charging. |
Battery not charging from solar, but grid charging works | Program 16 (Charger source priority) set to 'CUT' (Utility first) | Change Program 16 to 'CSO' (Solar first) or 'OSO' (Only Solar) to prioritize solar charging. |
Inverter displays Fault 03 (Battery voltage is too high) or Warning 03 (Battery is over-charged) | Incorrect charging voltage settings (Program 26/27) or incorrect battery configuration | Verify battery count (e.g. 2x12 V or 4x12 V). Adjust Program 26 (Bulk charging voltage at 25°C) and Program 27 (Floating charging voltage at 25°C) to match manufacturer specifications. |
Battery charges very slowly or not fully | Program 02 (Maximum charging current) or Program 11 (Maximum utility charging current) set too low | Increase Program 02 (combined solar + AC charge current) and/or Program 11 (utility charge current) to match battery capacity (e.g. 10%–15% of Ah for Lead-Acid; 20 A–30 A for 200 Ah). |
Inverter display is blank or shuts down after 3 seconds | Battery voltage too low or reverse polarity | Check battery connections for reverse polarity. Recharge battery externally if voltage is below 1.4V per cell (blank screen) or 1.91V per cell (shuts down after 3s). |
Inverter clicks repeatedly, LCD/LEDs flash | Battery disconnected or loose connection | Check all battery wiring and terminals for secure connections. Always kill power first and use insulated tools. |
Battery not charging, but PV voltage is good and grid is active | Incorrect Program 05 (Battery type) setting or BMS communication lost / lithium comm error (Warning 60 / 61) | Set Program 05 to match your battery type ('FLD', 'AGM', 'USE', 'PYL', 'Lib'). For lithium batteries, check the RJ45 BMS communication cable and ensure correct protocol selection. |
Grid charging not working, AC input shows 0V | AC input breaker tripped or voltage outside acceptable range | Reset the AC input breaker. Check utility voltage; ensure it is above 90 VAC in Appliance mode or 170 VAC in UPS mode. |
Inverter Charging Settings for Maxpower Suntronic Inverters
Maxpower Suntronic inverters, based on the Voltronic platform, offer programmable parameters that directly govern battery charging. Access these settings via the LCD panel buttons:
Charger Source Priority (Program 16)
Program 16 determines which energy source is prioritized for charging the battery bank:
CSO(Solar first): Solar energy will charge battery as first priority. Utility will charge battery only when solar energy is not available.CUT(Utility first): Utility will charge battery as first priority. Solar energy will charge battery only when utility power is not available.SNU(Solar and Utility, default): Solar energy and utility will charge battery at the same time. Recommended for areas experiencing frequent load shedding.OSO(Only Solar): Solar energy will be the only charger source no matter utility is available or not.
Output Source Priority (Program 01)
Program 01 controls power distribution to connected loads:
USB(Utility first): Utility provides power to loads as first priority; solar and battery power loads only when utility is unavailable.SUB(Solar-Utility-Battery): Solar energy provides power to loads as first priority. If solar is insufficient, utility supplies power to loads simultaneously. Battery provides power only when utility is unavailable.SBU(Solar-Battery-Utility): Solar energy provides power to loads as first priority, followed by battery, then utility.
Maximum Charging Current (Program 02 & Program 11)
These parameters limit the charging current supplied to the battery bank:
- Program 02 (Maximum charging current): Configures total combined charging current (solar charger current + AC utility charger current) from 10 A to 100 A / 120 A. The default is 60 A; set to 10%–15% of Ah for Lead-Acid (e.g. 20 A–30 A for 200 Ah); up to 120 A for lithium banks whose datasheet permits it (typically 200 Ah or paralleled packs; 100 Ah LiFePO4 packs are limited to 0.5–1C = 50–100 A) — never exceed the battery manufacturer's rated maximum charge current.
- Program 11 (Maximum utility charging current): Limits charging current supplied exclusively from the WAPDA grid (options: 2 A, 10 A, 20 A, 30 A, 40 A, 50 A, 60 A, 80 A, 100 A). The default is 30 A; set to 15 A–20 A for 200 Ah Tubular to prevent overheating.
Battery Chemistry Selection (Program 05)
Program 05 configures the battery profile:
AGM(default): Configures charge profiles for sealed AGM/Gel batteries.FLD(Flooded/Tubular): Configures charge parameters for traditional flooded lead-acid tubular batteries common in Pakistan.USE(User-Defined): Allows custom manual entry of charging parameters (Programs 26, 27, 29, 31).PYL(Pylontech) /Lib(Lithium): Auto-configures charging voltage and cut-off points based on direct BMS data over the RJ45 communication port. For related lithium troubleshooting, refer to our Maxpower lithium BMS fault comms fix guide.
Charging Voltage Parameters (Programs 26, 27, 29)
Voltage thresholds referenced to standard 25°C ambient temperature:
- Program 26 (Bulk charging voltage / C.V voltage): Available options for 24 V model: 28.2 V (default); for 48 V model: 56.4 V (default) at 25°C.
- Program 27 (Floating charging voltage): Available options for 24 V model: 27 V (default); for 48 V model: 54 V (default) at 25°C.
- Program 29 (Low DC cut-off voltage): Available options for 24 V model: 21.0 V (default); for 48 V model: 42.0 V (default) at 25°C. Protects cells from irreversible deep depletion.
Battery Equalization Settings (Programs 30, 31, 33, 35, 36)
Equalization is applied exclusively to flooded lead-acid batteries to reverse electrolyte stratification and dissolve sulfate buildup on lead plates.
During battery equalization (Program 30/31 at the default 29.2 V for 24 V systems or the default 58.4 V for 48 V systems, chosen from the 48.0 V to 61.0 V range and referenced to 25°C), flooded lead-acid batteries deliberately enter the hydrogen gassing region, emitting explosive hydrogen and oxygen gas. The battery compartment must have positive cross-ventilation and remain strictly free from sparks, open flames, or heat sources. Never equalize sealed lithium or AGM/gel batteries.
The equalization parameters operate as follows:
- Program 30 (Battery equalization enable): Set to enable for Flooded/Tubular batteries, or disable for lithium, AGM, and gel batteries.
- Program 31 (Battery equalization voltage): Default is 29.2 V for 24 V models (setting range 25.0 V to 31.5 V) and 58.4 V for 48 V models (setting range 48.0 V to 61.0 V).
- Program 33 (Battery equalized time): Default is 60 minutes (1 hour) (setting range is from 5 to 900 minutes).
- Program 34 (Battery equalized timeout): Default is 120min to achieve target voltage.
- Program 35 (Equalization interval): Default is 30 days (setting range is from 0 to 90 days; 30 to 60 days recommended for Pakistani tubular batteries).
- Program 36 (Equalization activated immediately): Manually triggers an immediate equalization cycle in float stage. Before activation, ensure the battery compartment has positive cross-ventilation and remains strictly free from sparks, open flames, or heat sources, as this process generates explosive hydrogen gas.
Safety: Working with Inverters and Batteries
Working with solar inverters and battery banks involves significant electrical hazards. Always adhere to strict safety protocols:
- High-Voltage DC Shock Hazard: Solar array open circuit voltages reach up to 500 VDC on Suntronic single-phase models and up to 600 VDC / 1000 VDC on Voltas series. High DC voltages present lethal shock hazards and persistent DC arcing risks. Never touch exposed terminals while circuits are energized.
- Mandatory 5-Minute Capacitor Discharge Delay: Internal DC bus capacitors store high energy. Technicians must wait at least 5 minutes after isolating PV, battery, and AC grid connections before removing enclosure covers or touching internal terminals.
- Insulated Tools and Terminal Isolation: Always kill power and isolate circuits before tightening or disconnecting battery terminals. Always use insulated tools; a spanner accidentally dropped across battery terminals shorts hundreds of amps, risking severe burns, arc flash, and battery explosion.
- Battery Acid and Eye Protection: When inspecting flooded tubular cells or topping up with distilled water, always wear eye protection and chemical-resistant gloves. Sulfuric acid causes severe chemical burns. Add pure distilled or demineralized water only; never add acid to existing cells.
- Hydrogen Gassing & Ventilation: During battery equalization (Program 30/31 at the default 29.2 V for 24 V systems or the default 58.4 V for 48 V systems, chosen from the 48.0 V to 61.0 V range and referenced to 25°C), flooded lead-acid batteries emit explosive hydrogen and oxygen gas. The battery compartment must have positive cross-ventilation. Never equalize sealed lithium or AGM/gel batteries.
- Air Filter Maintenance: Suntronic inverters include an anti-dust washable filter case on the side intake. The anti-dust kit air filter foam must be cleaned of dust every 1 month to prevent thermal throttling and Error 02 shutdown.
- Environmental Placement: Suntronic models feature an IP20 / IP21 enclosure rating designed strictly for indoor installation in a dry, ventilated, dust-controlled space. Voltas hybrid models feature IP65 / IP66 enclosures suitable for weather-sealed outdoor mounting.
When to call a technician instead
While most charging faults can be diagnosed through program settings and circuit breaker checks, certain issues require professional repair:
- Internal Component Faults: If the inverter displays internal hardware error codes such as Fault 08 (Bus voltage is too high), Fault 09 (Bus soft start failed), Fault 53 (Inverter soft start failed), Fault 55 (Over DC voltage in AC output / Output voltage is unbalanced), or Fault 57 (Current sensor failed), internal power components have failed. Return the unit to an authorized repair center.
- Severe Deep Discharge: If battery voltage has collapsed far below minimum thresholds (<1.4V/Cell) and does not respond to external bench charging, professional cell reconditioning or replacement is necessary.
- Warranty Protection: Maxpower provides an official 3 Years standard manufacturer warranty on the Suntronic retail line (some Voltas models carry 5–10 year warranties) through Maxell Power (Pvt) Ltd. Opening sealed internal casing or attempting board-level modifications voids warranty coverage.
For official support, contact Maxell Power (Pvt) Ltd helpline at 0331 1114414 or 042-111-441-441.
Still showing the fault? Book a technician
If the steps above did not clear it, tell us the inverter or battery and the exact code. We pass it to a technician who covers your city; visit charges are quoted before they come.
How this pays for the site: the technician or verifier pays SolarNevs a fixed introduction fee. Nobody pays to be recommended, and you are free to use our free guides instead.
Frequently asked questions
Why is my Maxpower inverter not charging from solar panels?
Your Maxpower Suntronic inverter may not be charging from solar if the PV voltage is below the MPPT startup threshold of 60 Vdc ± 10 Vdc for Suntronic PV 5000/6000 (PV 7000 Pro and PV 8000 Ultra use a 120–430 VDC MPPT window), or if Program 16 (Charger source priority) is set to 'CUT' (Utility first) instead of 'CSO' (Solar first) or 'OSO' (Only Solar).
What does Warning 15 (PV energy is low) mean on a Maxpower Suntronic inverter?
Warning 15 indicates that the solar panel generation is insufficient to support the load or battery charging (the inverter beeps twice every 3 seconds). This is normal during dawn, dusk, or cloudy conditions. Check for panel shading, heavy dust buildup, or a blown DC string fuse if it persists during peak sun hours. Before opening any string fuse holder, switch off the PV DC isolator — Suntronic arrays can sit at up to 500 VDC in daylight — and never pull a DC fuse under load. Always wait at least 5 minutes after isolating all power sources for internal capacitors to discharge before opening the inverter or touching internal components, and note that opening the inverter casing may void your warranty.
How do I ensure my Maxpower inverter charges the battery from the grid (WAPDA)?
To enable grid charging, set Program 16 (Charger source priority) to 'CUT' (Utility first) or 'SNU' (Solar and Utility). Also, ensure the AC input voltage is within the inverter's operating range (90-280 VAC in Appliance mode or 170-280 VAC in UPS mode) and that the AC input breaker is not tripped.
What is the correct battery type setting for a Maxpower Suntronic inverter?
For Maxpower Suntronic inverters, Program 05 (Battery type) should be set to 'FLD' for Flooded/Tubular batteries, 'AGM' for AGM/Gel, or 'USE' for User-Defined parameters. For lithium batteries with BMS communication, select 'PYL' (Pylontech) or 'Lib' (Lithium) to auto-configure charge voltages and switch cut-offs to SOC percentage, relying on the battery's BMS for optimal management.
What should I do if my Maxpower inverter displays Fault 03 (Battery voltage is too high)?
Fault 03 indicates the battery bank voltage has exceeded the high DC cut-off threshold (33 V for 24 V or 63 V for 48 V systems). Verify the correct number of batteries in your bank (e.g. 2x12 V or 4x12 V). Test individual cell voltages. Use insulated multimeter probes and tools, never bridge terminals, and isolate the charger before working at the battery bank. Always wait at least 5 minutes after isolating all power sources for internal capacitors to discharge before opening the inverter or touching internal components, and note that opening the inverter casing may void your warranty. Check the charge voltage settings in Program 26 (Bulk charging voltage at 25°C) and Program 27 (Floating charging voltage at 25°C).
References
- Axpert VM IV-4K6K-TWIN Off-Grid Manual — accessed 24 August 2026
- Maxpower Suntronic PV 5000 Pro Product Page — accessed 24 August 2026
- Maxpower Suntronic PV6000 Pro Product Page — accessed 24 August 2026
- Maxpower Voltas HYD-8K-H6 PRO Product Page — accessed 24 August 2026
Related guides
More from inverter errors & fixes.