MC4 Connector Melting and Burning Fix
Updated 6 September 2026 · By SolarNevs Research Desk, Dealer surveys + verified sources · 5 sources · Method ↗
Key Takeaways
- The most likely cause of MC4 connector melting or burning is poor installation quality or using incompatible connector brands.
- Your first check should be a visual inspection for discoloration, charring, or loose connections, always after safely disconnecting power.
- Never disconnect MC4 connectors under load, as this can cause dangerous electrical arcing and fire.
- If you observe active arcing, extensive melting, or are unsure about safely isolating the system, stop immediately and call a qualified solar technician.
Why are my MC4 connectors melting or burning?
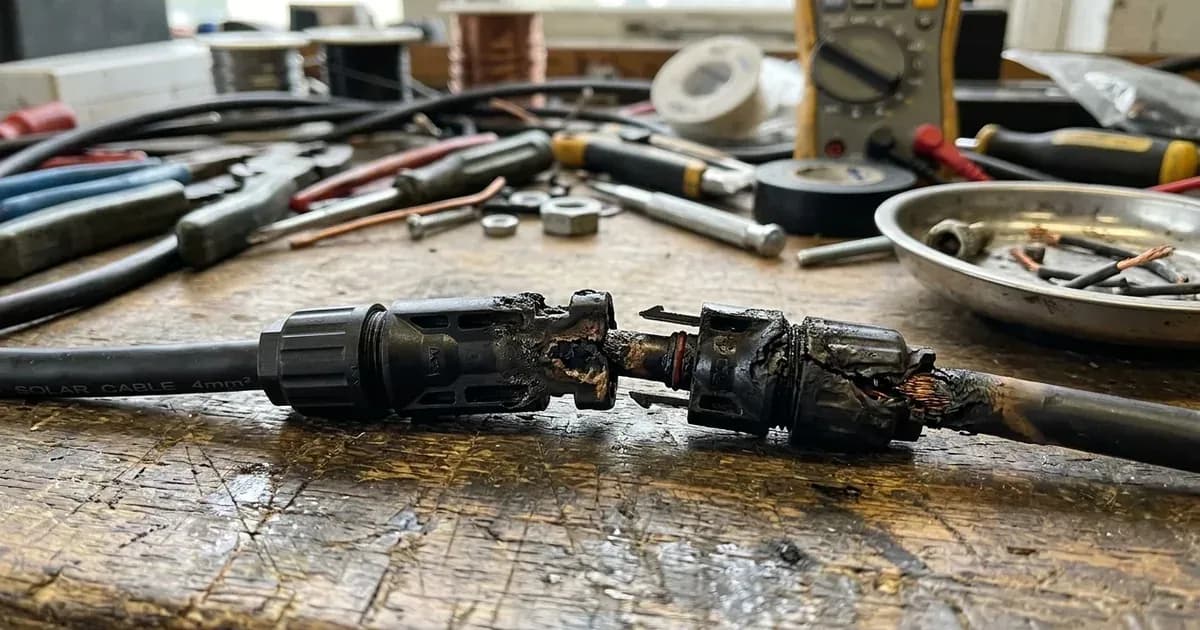
MC4 connectors melt or burn primarily due to high electrical resistance at the connection point, which generates excessive heat. This resistance is most commonly introduced by improper installation techniques or the use of incompatible components. Issues like incorrect crimping, terminals not fully seated, or cross-mating connectors from different manufacturers are frequent culprits.
Diagnosis
Before performing any checks, ensure the entire solar PV system is safely shut down and isolated from both the grid and battery storage. Never work on live electrical connections.
- Safety First: Isolate the System. Before touching any connectors, turn off your inverter, disconnect the PV array at the DC isolator, and if present, disconnect the battery. Wait for any residual power to dissipate. Never disconnect connectors under load.
- Visual Inspection for Damage. Carefully examine all MC4 connectors for signs of overheating. Look for:
- Discoloration: Brown, black, or scorched plastic.
- Melting: Deformed or bubbled plastic.
- Charring: Burn marks on the connector body or surrounding insulation.
- Loose Connections: Gently try to wiggle the connectors. Any movement could indicate a poor connection.
- Moisture or Debris: Check for water ingress, dust, or other contaminants inside or around the connector.
- Check for Cross-Mating. Verify that all connected male and female MC4 connectors are from the same manufacturer and product family. For instance, Amphenol states, "Non-Amphenol connectors, including those labeled as “Amphenol-compatible,” cannot be safely mated Amphenol elements." Stäubli advises that "Plugs and socket connectors mated together in a PV system shall be of the same type from the same manufacturer."
- Inspect Cable Strain. Look for excessive tension or bending on the cables where they enter the connectors. Excessive cable stress along the axial for extended amounts of time can impact sealing and reliability.
- Examine Environmental Factors. Note if connectors are bundled tightly together or covered by split loom, as this can restrict airflow and lead to overheating. Also, check for signs of exposure to chemical substances like grease or solvents, which can degrade connector materials.
Cause/fix table section
Symptom detail | Likely cause | Fix |
|---|---|---|
Connector overheating and potential fire | Use of the wrong crimping die | Ensure the correct crimping die is used for the specific connector model and wire gauge. Re-crimp with proper tools or replace the connector. Incorrectly crimped contacts are a common cause of electrical arcing. |
Connector overheating and potential fire | Terminals not inserted in the correct position | Verify that the metal terminals are fully seated and correctly aligned within the connector housing. If not, the contacts will not mate as intended, causing overheating. Reassemble the connector carefully. |
Burned connectors, arcing, fires | Cross-mating different connector brands | Replace all incompatible connectors with matching types from the same manufacturer. Mating incompatible plugs and sockets can lead to electrical arcing and fire. |
Contact corrosion | Chemical incompatibility or different thermal expansion parameters of metal contacts in cross-mated connectors | Replace all incompatible connectors with matching types from the same manufacturer. This prevents long-term degradation of the electrical contact. |
Electrical arcing | Moisture ingress degrading connections | Ensure all connectors are properly sealed during installation. Replace any connectors showing signs of moisture ingress. Unmated connectors must be protected from environmental impact with sealing caps. |
Electrical arcing | Incorrectly crimped connector contacts | Use a calibrated crimping tool and the correct die for the cable and contact. The crimp should have all cable strands compressed into a hexagonal shape with minimal voids. Re-crimp or replace the connector. |
Electrical arcing | Plugs and sockets not fully engaged | Ensure all connectors are fully pushed together until they click and are securely locked. A loose connection increases resistance. |
Overheating | Exposure to chemical substances (e.g., grease, oils, solvents) | Avoid exposing connectors to chemicals. If contaminated, clean thoroughly or replace if material properties are compromised. Chemical exposure may cause discoloration, softening, or cracking. |
Overheating | Placing split loom over connectors or zip ties directly in contact with connectors | Ensure adequate air circulation around connectors. Avoid placing split loom over connectors or zip ties directly in contact with connector housings. |
Overheating | Stacking or bundling multiple connectors together | Separate connectors to allow for proper heat dissipation. Avoid stacking or bundling multiple connectors tightly. |
Reduced sealing and reliability | Excessive cable stress along the axial for extended amounts of time | Ensure cables are properly supported and routed to prevent excessive strain on the connectors. Added cable stress and torque can impact sealing and reliability. |
Sealing failure and electrical leakage | Over-torqueing the back cap | Use a torque wrench to tighten the back cap within the specified range. For Amphe-PV H4 Plus connectors, this is 2.6 to 2.9 N·m. Over-torqueing can damage cable insulation and lead to sealing failure. |
Sealing failure and compromised reliability | Under-torqueing the back cap | Use a torque wrench to tighten the back cap within the specified range. For Amphe-PV H4 Plus connectors, this is 2.6 to 2.9 N·m. Under-torqueing can lead to sealing failure and compromise reliability. |
Connector Installation Best Practices
Proper installation is critical to prevent MC4 connector failures. Always refer to the manufacturer's instructions for specific models.
- Matching Connectors: Always use male and female connectors from the same manufacturer and product line. This is a fundamental safety requirement (IEC 60364-7-712:2017) and a condition for UL recognition. Amphenol states they are "not liable for any damage caused by mating unapproved connectors with Amphenol elements."
- Cable Preparation:
- Strip cable insulation to the length specified by the manufacturer. For Amphe-PV H4 Plus connectors, the stripping length is 7.0 ± 0.5 mm. Ensure you do not damage or cut wire strands.
- Use PV cable with copper conductors, and tin-coated wire is recommended. The cable must have certifications like EN 50618, IEC62930, UL 4703, or USE-2.
- Crimping:
- Use the correct crimping tool and die for the specific connector contact and cable gauge.
- Ensure the crimp is uniform, symmetrical, and captures all wire strands. There should be no cracks or fractures in the crimp material or wire stranding. The burr on the base of the crimp must not exceed 0.1mm.
- Assembly:
- Insert the crimped contact fully into the connector housing until it locks into place.
- Tighten the back cap to the manufacturer's specified torque. For Amphe-PV H4 Plus connectors, the back cap torque range is 2.6 to 2.9 N·m. For Stäubli PV-KBT4/xy-UR, PV-KST4/xy-UR connectors, the gland nut tightening torque is 3.4 Nm.
- Ensure the minimum straight cable length next to the connector is at least 20mm for Amphe-PV H4 Plus connectors.
- Environmental Protection:
- Avoid exposing connectors to chemical substances like grease, oils, or solvents.
- Prevent connectors from being immersed in water, even if they are IP68 rated.
- Protect unmated connectors with sealing caps to prevent moisture ingress.
- Avoid tight bundling or covering connectors with split loom or zip ties that restrict airflow, as this can lead to overheating.
Safety: Electrical Arcing and Fire Hazards
Working with solar PV systems involves high DC voltages and currents, which can be extremely dangerous. Electrical arcing is a significant hazard. The temperature of an electrical arc is easily hot enough to melt glass, copper, and aluminum, and to initiate the combustion of surrounding materials.
- Never disconnect under load: Always ensure the PV array is completely de-energized before disconnecting any MC4 connectors. Disconnecting under load will cause an arc, which can lead to severe burns, equipment damage, and fire.
- Eye Protection: Always wear appropriate eye protection when working with electrical components to guard against accidental arcing or flying debris.
- Insulated Tools: Use insulated tools when working near live electrical parts to prevent short circuits and electric shock.
- Contaminated Connectors: Never mate contaminated connectors (e.g., with dust, moisture, chemicals, or heat-shrink tubing). Contaminants can create pathways for arcing or degrade the connection.
When to call a technician instead
While some basic troubleshooting can be done, certain situations require a qualified solar technician:
- Active Arcing: If you observe visible arcing or hear crackling sounds, immediately isolate the system if safe to do so, and call a professional. Do not attempt to fix it yourself.
- Extensive Damage: If multiple connectors are severely melted, charred, or if there is damage to the solar panels or wiring, a comprehensive inspection and repair by a technician is necessary.
- Uncertainty: If you are unsure about any step of the diagnosis or repair process, or if you cannot safely isolate the system, it is always safer to contact a professional.
- Warranty Concerns: Attempting repairs yourself, especially if it involves opening sealed components or making modifications, may void your system's warranty. Connector manufacturers like Stäubli state that the installer is usually responsible for damage and malfunctions if products are not used as described in their intended use.
A qualified technician has the specialized tools, training, and experience to safely diagnose and repair PV system issues, ensuring compliance with safety standards and manufacturer guidelines.
Still showing the fault? Book a technician
If the steps above did not clear it, tell us the inverter or battery and the exact code. We pass it to a technician who covers your city; visit charges are quoted before they come.
How this pays for the site: the technician or verifier pays SolarNevs a fixed introduction fee. Nobody pays to be recommended, and you are free to use our free guides instead.
Frequently asked questions
Why do MC4 connectors melt or burn?
MC4 connectors often melt or burn due to high resistance caused by improper installation. Common issues include incorrect crimping, terminals not fully seated, using incompatible connector brands, or insufficient torque on back caps.
Can I mix MC4 connector brands in my solar system?
No, you should not mix MC4 connector brands. Manufacturers like Stäubli and Amphenol explicitly state that mating connectors from different brands can lead to burned connectors, arcing, and fires due as they are not assessed to operate with other manufacturers.
What is the correct torque for an MC4 connector's back cap?
For Amphe-PV H4 Plus connectors, the back cap should be torqued to 2.6 to 2.9 N·m. For Stäubli PV-KBT4/xy-UR or PV-KST4/xy-UR connectors, the gland nut tightening torque is 3.4 Nm.
What is electrical arcing in solar connectors?
Electrical arcing is the flow of electrical energy through an air gap by way of ionised gas molecules. This can occur in faulty connectors and generate temperatures hot enough to melt metals and ignite surrounding materials, posing a fire risk.
How can I prevent MC4 connector failure?
Prevent MC4 connector failure by using connectors from the same manufacturer, ensuring correct crimping with the proper die, fully seating terminals, applying specified torque to back caps, and avoiding chemical exposure or tight bundling.
References
- Amphe-PV H4 Plus Connectors Assembly Instructions — accessed 23 August 2026
- Stäubli RE-Statement PV CrossConnection ProductLiability — accessed 23 August 2026
- Stäubli PV_MA712-en Assembly Instructions — accessed 23 August 2026
- Fire in solar PV systems investigations evidence — accessed 23 August 2026
- Stäubli PV_MA231-en Assembly Instructions — accessed 23 August 2026
Related guides
More from inverter errors & fixes.