Sunsynk Inverter Offline? How to Fix Sunsynk Connect App Issues
Updated 16 September 2026 · By SolarNevs Research Desk, Dealer surveys + verified sources · 15 sources · Method ↗
Key Takeaways
- An "offline" status in the Sunsynk Connect app usually points to a problem with the datalogger or its network connection, not the inverter itself.
- Always start by checking the physical connection of the datalogger to the inverter and its Wi-Fi signal.
- Your router's settings, including 2.4GHz Wi-Fi, firewall ports 80 and 51100, and whitelisting
iot.e-linter.com:51100andukiot.sunsynk.net:51100, are critical for reliable communication. - Account-related issues, such as a "Gateway Bound Error" or inability to change settings, often stem from incorrect plant ownership or user permissions.
Why Your Sunsynk Inverter Shows Offline in the Connect App
When your Sunsynk inverter appears offline in the Connect app, it means the datalogger is not successfully sending data to the Sunsynk Connect Cloud. This can be frustrating, especially during load-shedding when you rely on monitoring your system's performance. The inverter itself may be operating correctly, but its communication link to the online platform is broken.
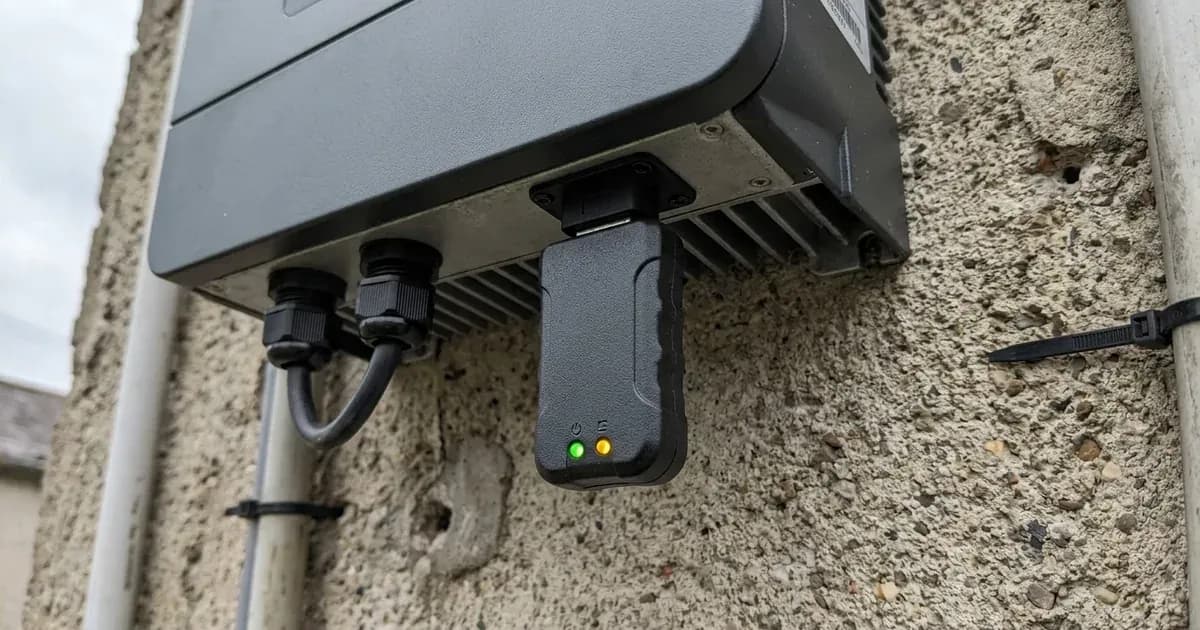
The Sunsynk Connect platform relies on a small device called a datalogger, sometimes referred to as a gateway or Wi-Fi stick. This datalogger plugs into your inverter and connects to your home or business Wi-Fi network. It then transmits your inverter's operational data to the Sunsynk Connect Cloud, which you access via the www.sunsynk.net portal or the mobile app. If any part of this chain – the datalogger, your Wi-Fi, your internet connection, or the Sunsynk Connect platform itself – experiences an issue, your inverter will show as offline.
Understanding the Sunsynk Datalogger and Connect Platform
The Sunsynk Datalogger is designed to connect your inverter to the Sunsynk Connect Cloud. It inserts into the DB9 interface of the inverter and is typically secured with screws. For Wi-Fi connection, the datalogger uses the 2.4GHz band, as it offers a longer range than 5GHz and is sufficient for the data transmission needs. Sunsynk Connect efficiently utilizes approximately 30 megabytes (30MB) of data per month for the seamless transmission of inverter data to the Sunsynk Connect Cloud.
The Sunsynk Connect platform offers various features, including a Dashboard for real-time data, Events to monitor alerts, Reports for detailed performance, and Settings to customise system preferences. You can access this platform via www.sunsynk.net or the Sunsynk Connect mobile app.
Common Offline Errors and Their Solutions
Here are the common error messages and symptoms you might encounter, along with their recommended solutions:
Code/Error | What it means | What to do |
|---|---|---|
Gateway Bound Error | The gateway (datalogger) is already being used with another inverter. | Ensure you are entering the gateway serial number and key correctly. Check your equipment tab or gateway section in the app to see if the serial number already exists. If confirmed, raise a support ticket with Sunsynk to locate and resolve the issue. |
Set Fail | An error occurred when trying to connect the datalogger to Wi-Fi. |
|
Datalogger Shows Green Light Only | This happens when the datalogger was initially connected with the Static IP button enabled, but the assigned static IP was not reserved, leading to another device using the same IP address. |
|
Datalogger shows No LED Lights | The datalogger is faulty, or there is no power to the datalogger from the inverter. |
|
Wi-fi Network Not Displayed During Connection | This can be caused by router settings (bandwidth, Wi-Fi type, security) or interference from Wi-Fi extenders or mesh networks. |
|
Datalogger not connecting to Sunsynk Connect Cloud | Connection issues between the inverter and datalogger, or the datalogger and the Sunsynk Connect Cloud. |
|
Datalogger shows no lights (Green or Red) due to faulty C9 capacitor | A faulty C9 capacitor on the Wi-Fi board prevents power from reaching the datalogger. | This requires internal work on the inverter. You can measure the voltage across the C9 capacitor (should be 9-12V). If no voltage, the C9 has failed. Removing the C9 from the PCB board using snips or a flat-head screwdriver may restore operation. Before beginning any work, please ensure the AC and DC supplies powering the inverter have been isolated. This is authorised-service work and requires 3rd Party Repair authorisation from Sunsynk Support. |
Unable to Change Settings Remotely | You have visitor rights to the plant, not owner or manager rights. | Contact the plant creator to request they share the plant with you as a manager or transfer ownership. If you are already a manager, ensure "Allow Remote Access" is enabled in the inverter settings ( |
Unable to Share or Transfer Plant | You are not the plant owner (creator). | Only the plant owner (creator) can share or transfer a plant. Reach out to the individual who set up the plant and request they perform the action. |
Network and Firewall Configuration for Sunsynk Connect
Proper network configuration is essential for your Sunsynk inverter to remain online. The datalogger connects to your Wi-Fi and then communicates with the Sunsynk Connect Cloud.
- Wi-Fi Band: The Sunsynk datalogger is designed to use 2.4GHz Wi-Fi networks. Ensure your router has 2.4GHz enabled, even if you also use 5GHz.
- SSID and Password: When connecting the datalogger to your Wi-Fi, ensure your 2.4GHz hotspot SSID (network name) and the password consist only of letters and numbers. Special characters or spaces can cause a "Set Fail" error.
- Firewall Ports: To enable communication between the Sunsynk Data Logger and Sunsynk Connect, you need to ensure that ports 80 and 51100 are open on your router or network firewall.
- Whitelist/Exceptions: Your router's settings may require you to add
iot.e-linter.com:51100andukiot.sunsynk.net:51100to its whitelist or exception list to prevent connection issues, particularly the "Set Fail" error. - DNS Error: If you encounter a DNS error, you can manually set the server address. Connect to the datalogger's EAP Wi-Fi, open a browser, and input the address
10.10.10.1/serverset.cgi?addr=ukiot.sunsynk.net:51100into the address bar to set the address. Note that the server shown in Sunsynk's instructions is its UK endpoint, and Sunsynk does not publish a regional server list — confirm the correct address for a South African installation with Sunsynk support before hard-setting it. Adding both addresses to your router's whitelist, by contrast, is safe and is what Sunsynk recommends generally.
Managing Your Sunsynk Connect Account and Plant Ownership
Account and plant management issues can also lead to an inverter appearing offline or prevent you from accessing its full functionality.
- Adding Multiple Inverters: To add multiple inverters to the same plant, each inverter needs its own dedicated Data Logger connected to Wi-Fi. First, create the plant with the Master inverter. Then, on
Sunsynk.net, navigate to your Plant List, click the three dots under 'More' for the plant, and select 'Add Gateway'. Enter the serial number and key of the additional datalogger. In the mobile app, tap 'Plants', select your plant, tap 'Equipment', then 'Gateway', and tap the '+' sign to scan a QR code or manually enter the serial number and key. - Transferring Plant Ownership: Only the plant owner (creator) can share or transfer a plant. If you need to transfer ownership, you must contact the individual who originally set up the plant. For companies managing multiple installations, you can create a master company account and ask individual installers to transfer plants to it.
- Unbinding a Datalogger: If you need to reuse a datalogger or replace a faulty one, you must unbind it from its current plant. On
Sunsynk.net, search for the datalogger serial number (Gateway) within Equipment, click the three small dots under 'More', and select 'Unbind'. Confirm the action. In the Sunsynk Connect App, go to 'Equipment' on the bottom panel, select 'Gateway' at the top, click the three small dots, and then 'Unbind'.
What You Can Check Yourself, and What You Cannot
Many initial checks for an offline Sunsynk inverter can be performed safely by you, the homeowner or system owner. These include:
- Physical Connections: Ensure the datalogger is securely inserted into the DB9 interface of the inverter.
- Router Status: Check if your router is powered on and broadcasting a Wi-Fi signal.
- Datalogger Lights: Observe the LED lights on the datalogger. If there are no lights, or only a green light, follow the troubleshooting steps provided above.
- Wi-Fi Settings: Verify your router's 2.4GHz band is enabled, and that your Wi-Fi SSID and password do not contain special characters.
- Basic Connectivity Tests: Use a smartphone or laptop to connect to the datalogger's EAP Wi-Fi and access
10.10.10.1/invinfo.cgiand10.10.10.1/loginfo.cgito diagnose connection issues. - App/Portal Access: Ensure you can log into
www.sunsynk.netor the Sunsynk Connect app and that your account permissions are correct for the actions you wish to perform.
However, certain issues require the attention of a qualified and registered person. Never attempt to open your inverter or work on its internal components unless you are a qualified and authorised technician.
- Internal Inverter Work: If the problem points to an internal inverter component, such as a faulty C9 capacitor on the Wi-Fi board, this requires isolating the AC and DC supplies powering the inverter. This is a hazardous operation and must only be performed by a registered person with appropriate authorisation from Sunsynk Support.
- Electrical Safety: Any work involving the inverter's wiring, AC tails, or grid protection settings requires a registered electrician and a Certificate of Compliance (CoC) in South Africa.
- Persistent Network Issues: If you have followed all network troubleshooting steps and the issue persists, your internet service provider or a network specialist may need to investigate your router or network configuration further.
What the Published Sources Do Not Tell You
While Sunsynk provides extensive support documentation, there are a few areas where specific details are not publicly available or are only broadly described:
- Detailed LED Status Meanings: The documentation covers "green light only" or "no LED lights" scenarios, but a comprehensive list of what every specific LED colour and blinking pattern signifies for the datalogger is not provided.
- The Exact "KEY" for Wi-Fi: The instructions mention using a "KEY that appears on the data logger" if the default
12345678password does not work for the EAP connection, but they do not specify where this key is located on the device or its format. - Full Sunsynk Klik Protocol List: The Sunsynk Klik device is mentioned as compatible with various BMS protocols, but a complete list of these supported protocols is not detailed in the available documentation.
- Specific Timer Settings: While the Sunsynk Connect app includes "Timer settings," the detailed steps or options within these settings are not explicitly outlined in the provided support articles.
These gaps mean that for certain specific diagnostic or configuration tasks, you may need to rely on direct contact with Sunsynk Support or the experience of your installer.
Frequently asked questions
Why is my Sunsynk inverter showing offline in the Connect app?
Your Sunsynk inverter appears offline in the Connect app when its datalogger cannot communicate with the Sunsynk Connect Cloud. This is often due to Wi-Fi connection problems, incorrect network settings, or issues with the datalogger itself.
What firewall ports does Sunsynk Connect require?
For communication between the Sunsynk Data Logger and Sunsynk Connect, you need to ensure that ports 80 and 51100 are open on your router or network firewall.
How much cellular data does Sunsynk Connect use?
Sunsynk Connect efficiently utilizes approximately 30 megabytes (30MB) of data per month for the seamless transmission of inverter data to the Sunsynk Connect Cloud.
What does a 'Gateway Bound Error' mean on Sunsynk Connect?
A 'Gateway Bound Error' typically means the datalogger's serial number is already in use with another inverter or plant. Verify the serial number and key, then contact Sunsynk Support if the issue persists.
Can I change inverter settings remotely via Sunsynk Connect?
You can change inverter settings remotely if you have 'owner' or 'manager' rights to the plant and 'Allow Remote Access' is enabled in the inverter's settings menu (Settings -> Basic -> Remote -> Allow Remote Access).
References
- Sunsynk Support Solutions — accessed 27 August 2026
- Sunsynk Support Solutions — accessed 27 August 2026
- Sunsynk Support Solutions — accessed 27 August 2026
- Sunsynk Support Solutions — accessed 27 August 2026
- Sunsynk Support Solutions — accessed 27 August 2026
- Sunsynk Support Solutions — accessed 27 August 2026
- Sunsynk Support Solutions — accessed 27 August 2026
- Sunsynk Support Solutions — accessed 27 August 2026
- Sunsynk Support Solutions — accessed 27 August 2026
- Sunsynk Support Solutions — accessed 27 August 2026
- Sunsynk Support Solutions — accessed 27 August 2026
- Sunsynk Support Solutions — accessed 27 August 2026
- Sunsynk Support Solutions — accessed 27 August 2026
- Sunsynk Support Solutions — accessed 27 August 2026
- Sunsynk Support Solutions — accessed 27 August 2026
Related guides
More from inverter errors & fixes.