Sunsynk Data Logger and Connect App Monitoring Setup Guide
Updated 16 September 2026 · By SolarNevs Research Desk, Dealer surveys + verified sources · 17 sources · Method ↗
Key Takeaways
- The Sunsynk data logger connects to your inverter via a DB9 interface and requires a 2.4GHz Wi-Fi network or an Ethernet cable for internet connectivity.
- Initial Wi-Fi setup involves connecting to the data logger's own hotspot (SSID
EAP-*****, password12345678) to configure its connection to your home network. - Your router must have ports
80and51100open, and you may need to whitelist specific Sunsynk server addresses to prevent "Set Fail" or "DNS Error" messages. - Remote control of inverter settings through the Sunsynk Connect app requires you to have owner or manager permissions for the plant and for "Allow Remote Access" to be enabled on the inverter.
Understanding Sunsynk Remote Monitoring
Sunsynk inverters can be monitored remotely using a data logger and the Sunsynk Connect platform. This allows you to view real-time data, track performance, and sometimes adjust settings from your smartphone or computer. The data logger acts as a bridge, sending your inverter's operational data to the Sunsynk Connect cloud. This remote access is particularly useful in South Africa for monitoring system performance during load-shedding or ensuring optimal energy usage.
Sunsynk Connect efficiently uses approximately 30 megabytes (30MB) of data per month for the seamless transmission of inverter data to the Sunsynk Connect Cloud.
Installing Your Sunsynk Data Logger
The data logger is a crucial component for remote monitoring. It connects directly to your Sunsynk inverter and then to your internet network.
Physical Installation
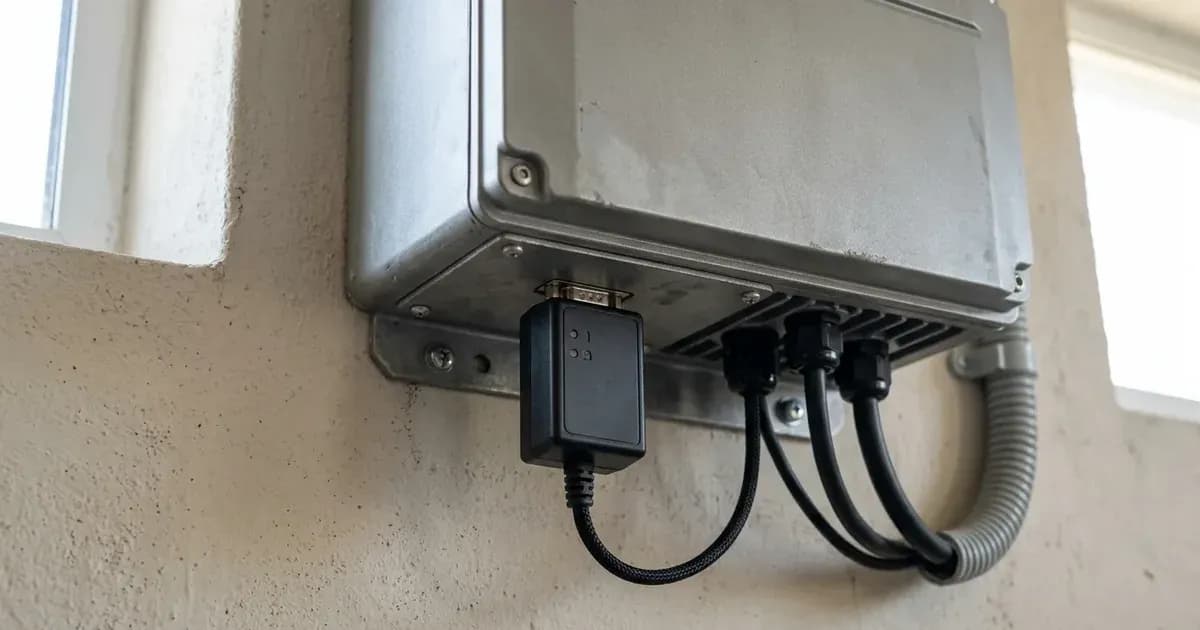
- Connect to Inverter: Insert the Data Logger into the DB9 interface of the inverter.
- Secure Connection: Insert the two screws that come with the Data Logger through the holes, and then tighten them with a Phillips screwdriver to ensure a secure fit.
- Ethernet Option: If using an Ethernet connection, pass the network cable through its specific hole at the bottom of the shell. Then, insert the RJ45 plug into the RJ45 socket, and place the sealing plug with the hole on the network cable.
The data logger receives 12V DC voltage from pins 5 (GND) and 9 (+12V) of the DB9 serial port socket of the Inverter that the Datalogger is plugged into.
Connecting the Data Logger to Your Network
Once physically installed, the data logger needs to connect to your home or office network to send data to Sunsynk Connect. This process typically involves connecting to the data logger's own Wi-Fi hotspot first.
Wi-Fi Pairing Procedure
- Identify Data Logger Hotspot: On your smartphone or laptop, search for available Wi-Fi networks. You will see an available connection with the SSID
EAP-*****, where*****are the last 5 digits of the serial number on the data logger. - Connect to Hotspot: Select this connection. The password is
12345678. If this password is not accepted, please try using the KEY that appears on the data logger. - Access Configuration Page: Once connected to the data logger's hotspot, open your internet browser (e.g., Safari or Google Chrome) on the same device and search the IP address
10.10.10.1. - Scan for Home Wi-Fi: On the configuration page, click ‘Scan’ to search for available Wi-Fi networks. You should see your home Wi-Fi connection in the list.
- Connect to Home Wi-Fi: Select your internet or Wi-Fi connection, enter your password, and click ‘Connect’.
Server URL Configuration
If you encounter a "DNS Error" (meaning the data logger cannot resolve the server address), you may need to manually set the server address:
- Connect to Data Logger Hotspot: Connect to the Wi-Fi stick hot spot (SSID
EAP-*****, password12345678). - Set Server Address: Input the address
10.10.10.1/serverset.cgi?addr=ukiot.sunsynk.net:51100into the address bar of your browser to set the server address (note that this default points to Sunsynk's UK/international endpoint; confirm the correct regional endpoint with Sunsynk support if instructed). - Restart Data Logger: Power Off & On the Wi-Fi stick to restart it.
Ensuring Network Compatibility and Security
For reliable communication, your network must meet certain requirements.
Firewall and Port Requirements
To enable communication between the Sunsynk Data Logger and Sunsynk Connect, you need to ensure that ports 80 and 51100 are open on your network.
If you get the error "Set Fail" when trying to connect your data logger to your Wi-Fi, this could be caused by your connection type or firewall. Within your router settings, you may need to add two connection addresses to the whitelist or exception list: iot.e-linter.com:51100 and ukiot.sunsynk.net:51100.
Wi-Fi Network Compatibility
Sunsynk Data Loggers are only compatible with 2.4GHz networks. If your WLAN is configured to dual band or triple band, it may not be recognised by the data logger. Ensure that your router has 2.4GHz enabled as well as 5GHz. Also, ensure that your 2.4GHz hotspot SSID (the name) and the password consist only of letters and numbers, removing any special characters or spaces.
While Sunsynk Data Loggers are compatible with Wi-Fi 6 and Wi-Fi 6e (provided the router device has backwards compatibility with Wi-Fi 6 devices) if it supports the 2.4GHz bandwidth, Wi-Fi 7 routers can sometimes cause issues. Although Wi-Fi 7 routers are compatible with 2.4GHz band devices, instances occur where the data loggers will not recognise the network.
The network security required for Sunsynk Data Loggers to connect to the WLAN must be WPA2 or WPA2/3 adaptable. There are issues when trying to connect to networks with WPA3 only security settings. Interference from Wi-Fi extenders or mesh network nodes can also cause signal interference.
Using the Sunsynk Connect App
The Sunsynk Connect app and web portal (www.sunsynk.net) provide a comprehensive interface for monitoring and managing your solar system.
Key Features
- Dashboard: Provides real-time data on production, consumption, and storage.
- Events: Allows you to monitor events and alerts from your system.
- Reports: Offers detailed performance reports.
- Settings: Enables you to customise system preferences.
Managing Multiple Inverters and Plants
To incorporate additional inverters into a plant, ensure that each inverter has its dedicated Data Logger. Once they are all connected to the Wi-Fi, proceed to create the plant using the Master inverter. You can then use the 'Add Gateway' feature on Sunsynk.net or the mobile app to add other inverters. The term ‘Gateway’ in this context refers to the Data Logger.
Unbinding a Data Logger
If you need to reassign a data logger, you can unbind it.
- Via Sunsynk.net: Search for the Data Logger serial number (Gateway) within Equipment. Click the three small dots on the right-hand side under More. At the bottom of the list, you will see the Unbind button.
- Via Sunsynk Connect App: On the home page, press Equipment on the bottom panel. This will open a new menu where at the top you select Gateway and should bring up all your plants dataloggers. Click the small three dots on the right-hand side; this will bring up a menu at the bottom with an unbind button.
- Important Note: Please note that once the data logger is unbound, the data history of the Plant will be lost.
Sharing and Editing Plant Details
- Sharing a Plant: Only the plant owner (creator) can share a plant. To share, log in to the portal, go to 'Plant List', find the plant, click the three dots under 'More', select 'Share', click 'Add Account', enter the customer's email, select the desired role, and click 'Confirm'. Ensure the customer has a registered account.
- Editing Plant Details: To access and edit plant details (name, capacity, commissioning date, address, time zone), navigate to the plant overview screen and click on the yellow box located within the Plant Info section. Remember to press save at the bottom to keep all amended details.
- Editing Revenue Information: In the 'Revenue Information' section, you can set your currency, total investment, and valuation method (e.g., constant price, time of use price).
- Editing Contact Information: The 'Contacts' section allows you to update manager name, phone, and email details.
Troubleshooting Common Data Logger Issues
Several issues can prevent your data logger from connecting or functioning correctly.
Issue / Error Code | Probable Cause | Corrective Action |
|---|---|---|
"Set Fail" Error | 5GHz-only Wi-Fi, special characters in SSID/password, or firewall blocks | Enable 2.4GHz, use alphanumeric credentials, and whitelist |
"Gateway Bound Error" | Gateway serial number is already registered to another plant/inverter | Verify serial number and key under Equipment tab; open Sunsynk support ticket if already bound. |
"DNS Error" | Data logger cannot resolve cloud server host address | Navigate to |
Green LED Only | IP address conflict on local network | Reserve a dedicated static IP for the data logger in router DHCP settings. |
No LED Lights | Missing 12V DC power from DB9 port (pins 5 & 9) or failed C9 capacitor | Check DB9 physical seating; test capacitor voltage (9–12V DC); engage technician if hardware service needed. |
Error Messages
- "Set Fail" Error: As mentioned, this indicates a connection type or firewall issue. Ensure your router has 2.4GHz enabled, your Wi-Fi SSID and password contain only letters and numbers, and whitelist
iot.e-linter.com:51100andukiot.sunsynk.net:51100. - "Gateway Bound Error": This usually means that the gateway (data logger) is already being used with another inverter. Ensure you are entering the correct gateway serial number and key. Check your equipment tab or gateway list to confirm the serial number doesn't already exist. If confirmed, you may need to raise a support ticket with Sunsynk.
- "DNS Error": This occurs when the data logger cannot resolve the server address. Follow the server URL configuration steps outlined above.
LED Status and Power Issues
- Data logger shows green light only: This often happens if the assigned static IP hasn’t been reserved, and another device on your network has connected using the same IP address.
- Data logger shows no LED lights: If the Datalogger is showing no Green or Red LED and the Inverter is offline, but the 'Normal' LED is lit and the System Power Flow appears to be showing correct information for Grid, Load, PV and Battery, then this could be one of two issues: the Datalogger is faulty, or there is no power to the Datalogger from the Inverter. The voltage to the Datalogger is via Pins 5 (GND) and 9 (+12V) of the DB9 serial port socket of the Inverter that the Datalogger is plugged into.
- Faulty C9 Capacitor: In some cases, a faulty C9 capacitor on the Wi-Fi board can prevent power from reaching the data logger. You can measure the voltage across the capacitor; it should be 9-12V. If no voltage is received, the capacitor has failed. While the capacitor is a non-essential component, removing it involves opening the inverter or data logger unit, which should only be performed by a qualified and registered technician.
Wi-Fi Network Not Displayed
If your Wi-Fi network is not displayed during connection setup, consider these factors:
- 2.4GHz Compatibility: Sunsynk Data Loggers are only compatible with 2.4GHz networks. Your WLAN may be configured to dual band or triple band, which may not be recognised.
- Router Type: Wi-Fi 7 routers, despite being 2.4GHz compatible, sometimes do not recognise the data loggers.
- Security Settings: The network security must be WPA2 or WPA2/3 adaptable. WPA3-only security settings can cause issues.
- Interference: Interference from Wi-Fi extenders or mesh network nodes can cause signal issues.
Checking Data Logger Connection
You can check the connection status between the inverter and data logger, and between the data logger and the Sunsynk Connect Cloud:
- Inverter to Data Logger: Connect to the data logger hotspot (EAP-*, password
12345678). Open a browser and enter10.10.10.1/invinfo.cgiinto the address bar. - Data Logger to Sunsynk Connect Cloud: Connect to the data logger hotspot. Open a browser and enter
10.10.10.1/loginfo.cgiinto the address bar.
What You Can Change Yourself, and What Requires a Professional
As a system owner, you have control over many aspects of your Sunsynk Connect experience, but certain tasks require a registered professional for safety and compliance.
Owner-Managed Settings
You can manage most settings within the Sunsynk Connect app and web portal:
- Plant Details: Edit plant name, capacity, commissioning date, address, and time zone.
- Revenue Information: Configure currency, total investment, and valuation methods.
- Contact Information: Update manager, phone, and email details.
- Sharing Plants: Share access to your plant with others (if you are the owner).
- Remote Access (Inverter): If you are the owner or manager of the plant, you can enable remote control of inverter settings via Sunsynk Connect. This is done on the inverter display under
Settings -> Basic -> Remote -> Allow Remote Access. If you are unable to change inverter settings using the Sunsynk Connect app or platform, this will be because you only have visitor rights to the plant.
Professional-Level Work
Any work that involves opening the inverter or data logger unit, or making changes to grid-protection settings, must be performed by a qualified and registered person. This includes:
- Internal Hardware Repairs: Diagnosing and potentially replacing components like the C9 capacitor on the Wi-Fi board. Opening the unit is authorised-service work.
- Grid Connection Settings: Modifying settings related to grid interaction, such as export limits or voltage parameters, requires a Certificate of Compliance (CoC) and adherence to national grid standards standards in South Africa. Incorrect settings can compromise grid stability and safety.
What the Published Sources Do Not Tell You
While Sunsynk provides extensive documentation, some details are not explicitly covered in the available sources:
- Specific Data Logger Models: The documentation refers to a generic "Sunsynk Data Logger" without detailing specific models or their unique features, beyond the Sunsynk Klik which has a different function.
- Ethernet Data Logger Configuration: Beyond the physical connection, detailed instructions for configuring an Ethernet data logger (e.g., specific IP settings) are not provided, unlike the comprehensive Wi-Fi setup steps.
- Full Firewall Port List: the manufacturer documentation explicitly lists ports
80and51100. Other commonly used ports like8883(MQTT) and443(HTTPS) are not mentioned in the firewall requirements, although they might be implied for general internet communication. - Advanced DNS Configuration: While a manual server address setting is provided for "DNS Error", detailed steps for configuring specific DNS servers on the data logger are not available.
- Data Logger Firmware Updates: The process for updating data logger firmware is not described, implying this is typically handled by support or automatic processes.
- Static IP Configuration: Instructions on how to configure the data logger with a static IP address are not provided, only troubleshooting for issues arising from an unreserved static IP.
- LED Indicator Meanings: A comprehensive guide to the meaning of different LED light patterns on the data logger is not detailed, beyond fault symptoms like "green light only" or "no LED lights".
Frequently asked questions
How do I connect my Sunsynk data logger to Wi-Fi?
First, connect to the data logger's Wi-Fi hotspot (SSID `EAP-*****`, password `12345678`). Then, open a browser to `10.10.10.1`, scan for your home Wi-Fi network, select it, enter your password, and click 'Connect'. Ensure your home Wi-Fi is 2.4GHz.
What firewall ports does Sunsynk Connect require?
To enable communication between your Sunsynk Data Logger and Sunsynk Connect, ports `80` and `51100` must be open on your network. You may also need to whitelist `iot.e-linter.com:51100` and `ukiot.sunsynk.net:51100`.
Why am I getting a 'Set Fail' error when connecting my data logger?
A 'Set Fail' error often indicates a connection type or firewall issue. Ensure your router has 2.4GHz enabled, and that your Wi-Fi SSID and password only contain letters and numbers. Whitelisting `iot.e-linter.com:51100` and `ukiot.sunsynk.net:51100` in your router settings can resolve this.
How much data does Sunsynk Connect use per month?
Sunsynk Connect efficiently uses approximately 30 megabytes (30MB) of data per month for the seamless transmission of inverter data to the Sunsynk Connect Cloud.
Can I change inverter settings remotely using the Sunsynk Connect app?
Yes, if you have owner or manager rights for the plant. You must also ensure that 'Allow Remote Access' is enabled on your inverter's display under `Settings -> Basic -> Remote`.
References
- Sunsynk Support: How much cellular data does Sunsynk Connect use — accessed 27 August 2026
- Sunsynk Support: Connecting to the internet — accessed 27 August 2026
- Sunsynk Support: Set Fail error — accessed 27 August 2026
- Sunsynk Support: DNS error — accessed 27 August 2026
- Sunsynk Support: Firewall ports — accessed 27 August 2026
- Sunsynk Support: Datalogger shows green light only — accessed 27 August 2026
- Sunsynk Support: Datalogger shows no LED lights — accessed 27 August 2026
- Sunsynk Support: Wi-Fi network not displayed during connection — accessed 27 August 2026
- Sunsynk Support: Unable to change settings remotely — accessed 27 August 2026
- Sunsynk Support: Gateway bound error — accessed 27 August 2026
- Sunsynk Support: Troubleshooting datalogger connection issues — accessed 27 August 2026
- Sunsynk Support: Removing a faulty C9 capacitor — accessed 27 August 2026
- Sunsynk Support: Remote monitoring with Sunsynk Connect — accessed 27 August 2026
- Sunsynk Support: Adding multiple inverters to the same plant — accessed 27 August 2026
- Sunsynk Support: How to unbind a datalogger via Sunsynk.net — accessed 27 August 2026
- Sunsynk Support: Sharing a plant with a customer — accessed 27 August 2026
- Sunsynk Support: How to edit plant details — accessed 27 August 2026
Related guides
More from inverter errors & fixes.