Victron Centaur Battery Charger Installation and Multi-Bank Wiring Guide
Updated 6 September 2026 · By SolarNevs Research Desk, Dealer surveys + verified sources · 1 source · Method ↗
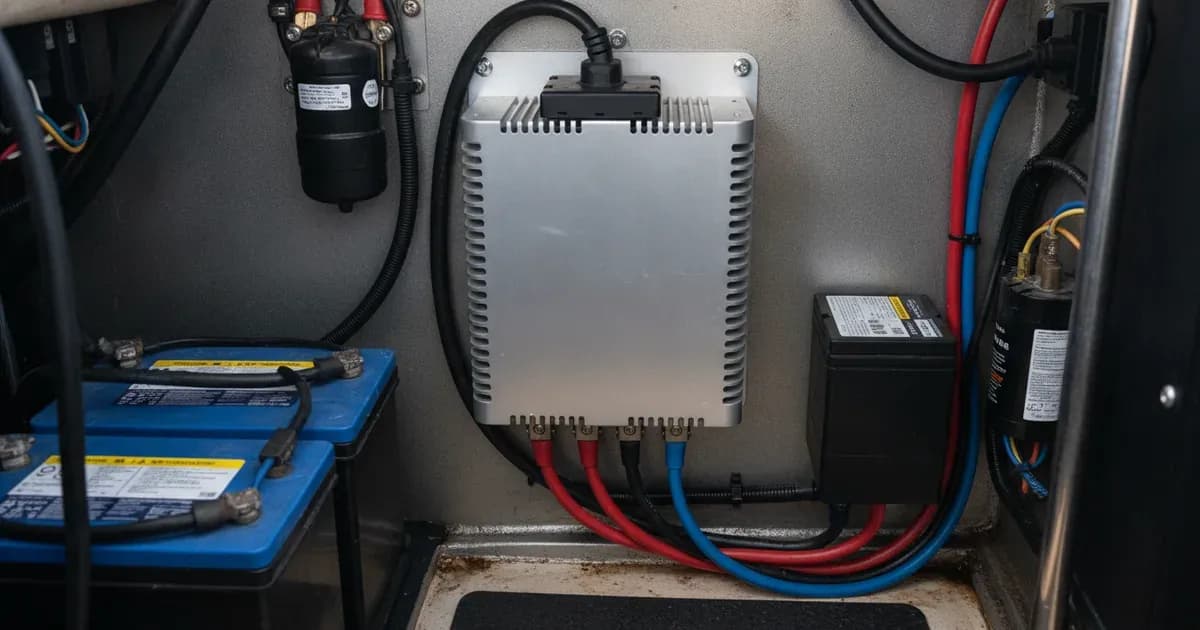
Key Takeaways
- Victron Centaur chargers feature a universal auto-ranging AC input from 90V to 265V and DC input from 90V to 400V.
- Each Centaur charger provides three isolated DC outputs, capable of simultaneously charging three independent battery banks.
- Battery chemistry (Flooded, Gel, AGM) is selected via DIP switches located under the front panel.
- Always isolate power sources and disconnect AC mains and battery power using insulated tools before making connections or adjustments to avoid short circuits.
How do I install and wire a Victron Centaur battery charger for multiple banks?
Victron Centaur battery chargers are engineered for robust performance in marine, commercial, and off-grid applications, featuring a universal input stage and three isolated DC outputs for multi-bank charging. Proper installation involves secure physical mounting, correct AC and DC wiring, and accurate battery chemistry selection via DIP switches. This ensures optimal charging and system longevity.
Installation and Wiring Steps
Follow these steps to correctly install and wire your Victron Centaur battery charger.
- Mount the Charger:
- Select a solid, non-flammable bulkhead for mounting.
- Mount the charger vertically to ensure proper heat dissipation.
- Maintain at least 10 cm (4 inches) of clearance around all air vents to allow for adequate airflow. Inadequate clearance can lead to thermal current derating, where the output automatically reduces to approximately 80% of nominal at 50°C and 60% at 60°C ambient temperature.
- The enclosure has an IP20 ingress protection rating.
- Connect Chassis Ground:
- Locate the chassis ground terminal on the charger.
- Securely connect this terminal to the vessel or vehicle's common earth ground. This is a critical safety step.
- Wire the AC Input:
- Ensure all AC mains power is disconnected at the source before proceeding.
- The Centaur charger features a heavy-duty screw-clamp terminal block for AC connections, accepting wires up to 4 mm² (AWG 6).
- Connect the AC input wiring to the designated terminals. The charger operates seamlessly with a universal input range of 90V to 265V AC (45Hz to 65Hz) and can also operate from 90V to 400V DC. It has an active power factor correction, with a power factor of 1.
- Wire the DC Outputs to Battery Banks:
- Ensure all battery connections are disconnected before proceeding.
- Victron Centaur chargers provide three isolated DC outputs. Each output is capable of supplying the full rated charger current if required.
- Connect each battery bank to its dedicated DC output terminal.
- Note the stud sizes: M6 studs are used on models like the Centaur 12/20, 12/30, and 24/16. M8 studs are used on all higher models.
- Ensure all connections are tight and secure. Loose connections can cause resistance and heat buildup.
- Select Battery Chemistry (DIP Switches):
- With AC mains and battery connections disconnected, carefully open the front panel to access the DIP switches.
- These switches allow selection between Flooded Lead-acid, Gel, and AGM battery charging profiles.
- The standard absorption voltage is 14.3V for 12V models and 28.5V for 24V models. The standard float voltage is 13.5V for 12V models and 27.0V for 24V models.
- Setting incorrect DIP switch positions can apply wrong absorption or float voltages, risking overcharging Gel batteries or undercharging AGM/Flooded banks.
- Close the front panel securely after making your selection.
- Verify Connections and Power On:
- Double-check all AC and DC wiring for correct polarity and secure connections.
- Ensure the chassis ground is properly connected.
- Reconnect battery banks, then reconnect AC mains power.
- Observe the front-panel analog ammeter, which displays the total combined DC output current in real time.
Configuration Details
This table outlines key specifications and configuration parameters for Victron Centaur chargers.
Parameter | Specification/Detail | Notes |
|---|---|---|
Universal AC Input Range | 90V to 265V AC | Auto-ranging, 45Hz to 65Hz frequency. |
Universal DC Input Range | 90V to 400V DC | Operating capability. |
Number of Output Banks | 3 isolated DC outputs | Each output can supply full rated current. |
Charge Profile | Three-stage IUoU | Bulk, Absorption (4-hour timer after output drops to 70% rated Amps), Float. |
Standard Absorption Voltage | 14.3V (12V models) / 28.5V (24V models) | DIP switch selectable. |
Standard Float Voltage | 13.5V (12V models) / 27.0V (24V models) | DIP switch selectable. |
Temperature Compensation | -2 mV/°C per cell | Internal sensor provides automatic charge voltage compensation. |
Operating Temperature Range | -20°C to +60°C | Output current derates at higher ambient temperatures. |
AC Connection | Screw-clamp terminal block | Accepts up to 4 mm² (AWG 6) wire. |
Battery DC Connections | M6 or M8 studs | M6 for smaller models (e.g., 12/20, 12/30, 24/16); M8 for larger models. |
Battery Chemistry Selection and Charging Profile
Victron Centaur chargers use a three-stage IUoU charging characteristic to optimize battery health and lifespan. The specific voltage setpoints for absorption and float stages are determined by the battery chemistry selected via the DIP switches.
The charger delivers full bulk current until the output current drops to 70% of the rated Amps, at which point a 4-hour absorption timer begins. After the absorption phase, the charger transitions to float voltage. An integrated internal temperature sensor provides automatic charge voltage compensation at -2 mV/°C per cell. This compensation is crucial, as charge setpoints are typically referenced to 25°C. For installations in hotter environments, the charger will automatically reduce the charge voltage to prevent overcharging.
Safety: Critical Guidelines for Installation and Operation
Working with battery chargers and electrical systems carries inherent risks. Adhere strictly to these safety guidelines:
- Disconnect Power: Always isolate power sources and disconnect AC mains power and all battery connections using insulated tools before opening terminal covers, adjusting DIP switches, or performing any maintenance to avoid accidental short circuits.
- Grounding: Ensure the chassis ground terminal is securely connected to a common earth ground. This protects against electrical shock in case of an internal fault.
- Mounting: Mount the charger vertically on a solid, non-flammable surface. Maintain at least 10 cm (4 inches) of clearance around air vents to prevent overheating.
- Ventilation: The charger features a temperature and current controlled variable speed fan for forced cooling. Do not block air vents.
- Over Temperature Protection: Power components automatically shut down if internal heat sink temperatures exceed safety limits. The output will also reduce at high ambient temperatures (e.g., 80% at 50°C, 60% at 60°C).
- Tools: Use insulated tools when working with electrical connections to prevent accidental short circuits. A spanner across a battery bank can short hundreds of amps, causing severe burns and damage.
When to call a technician instead
While many installation steps can be performed by a competent individual, there are situations where professional assistance is necessary. You should call a qualified technician if:
- You are unsure about any wiring diagrams or electrical connections.
- The charger exhibits persistent fault indications or unusual behavior after installation.
- Internal components appear damaged or you suspect an internal fault.
- You need to perform any service that requires opening the main enclosure beyond accessing DIP switches, as this is typically authorized-service work and may void your warranty.
- You are dealing with high voltage AC or DC systems and lack the necessary experience or safety equipment.
Add a battery at a surveyed price
Installers quote supply and fitting of the battery on this page for your existing or new system.
How this pays for the site: installers pay SolarNevs a fixed introduction fee when we pass them a genuine enquiry. They cannot pay to appear higher, and our surveyed prices are published before any introduction. You can also take our dated price tables straight to any installer.
Frequently asked questions
What is the input voltage range for Victron Centaur chargers?
Victron Centaur chargers feature a universal auto-ranging AC input from 90V to 265V AC (45Hz to 65Hz) and can also operate from 90V to 400V DC. This eliminates the need for manual voltage switching or tap changes.
How many battery banks can a Centaur charger charge simultaneously?
All Victron Centaur models are equipped with three isolated DC outputs. These allow simultaneous charging of three independent battery banks, with each output capable of supplying the full rated charger current if required.
What charging profile do Victron Centaur chargers use?
Victron Centaur chargers utilize a three-stage IUoU charging characteristic. They deliver full bulk current until the output drops to 70% of rated Amps, then initiate a 4-hour absorption timer before transitioning to float.
How do I select the battery type for my Centaur charger?
Battery chemistry selection for Flooded Lead-acid, Gel, and AGM profiles is performed using DIP switches located under the front panel. Always isolate power sources and disconnect AC mains and battery power using insulated tools before adjusting switches to avoid short circuits.
What safety precautions should I take when installing a Centaur charger?
Always isolate power sources and disconnect AC mains power and battery connections using insulated tools before opening terminal covers or adjusting DIP switches to avoid accidental short circuits. Mount the charger vertically on a solid, non-flammable bulkhead with at least 10 cm (4 inches) of clearance around air vents. Ensure the chassis ground terminal is securely connected to a common earth ground.
References
- Datasheet-Centaur-Charger-EN.pdf — accessed 23 August 2026
Related guides
More from what to buy — and how not to get cheated.